How to Make a Popsicle Stick Picture Frame
Build a square picture frame from eight craft sticks with overlapped corners, then add a card pocket for the photo and a twine loop or stick stand.

Tutorial at a glance
What you need
- About 9 standard craft sticks (8 for the frame, 1 for the optional stand), plus spares
- White craft glue or tacky glue
- Thin card about 4.25 in (10.8 cm) square
- Twine, about 4 in (10 cm)
- Clothespins
- Wax paper or baking parchment
- Scissors, pencil and ruler
- Optional acrylic craft paint and buttons
Eight sticks and a piece of card are enough to make a popsicle stick picture frame that holds a small square photo. The frame is a square with overlapped corners, built in two rounds so that each side ends up two sticks wide, and the photo slips into a card pocket on the back so you can change it whenever you like.
No cutting of sticks is needed.
Size and Shape of the Frame
Standard craft sticks are about 4.5 in long and 3/8 in wide (11.4 cm x 1 cm), so the finished frame is about 4.5 in (11.4 cm) square. With each side two sticks wide, the border is about 3/4 in (1.9 cm) all around and the opening in the middle is roughly 3 in (7.5 cm) square. Packs vary, so measure your own opening before trimming a photo.
The corners are overlapped: the end of one stick lies on top of the end of the next, which gives a wide glued area. The guide to craft stick joints and how to reinforce them explains why this holds so much better than sticks glued end to end.
What You Need
- About 9 standard craft sticks: 8 for the frame and 1 for the optional stand, plus a few spares
- White craft glue or tacky glue
- Thin card, such as kraft card or a cereal box, about 4.25 in (10.8 cm) square
- A sheet of paper with a true square corner
- Clothespins and wax paper or baking parchment
- Scissors, pencil and ruler
- Twine, about 4 in (10 cm), for a hanging loop
- Fine sandpaper or an emery board
- Optional: acrylic craft paint, a brush and a few buttons
Building the Frame Square
Work on wax paper. Lay the sheet of paper underneath it, where you can see its corner, and use that corner as your guide.
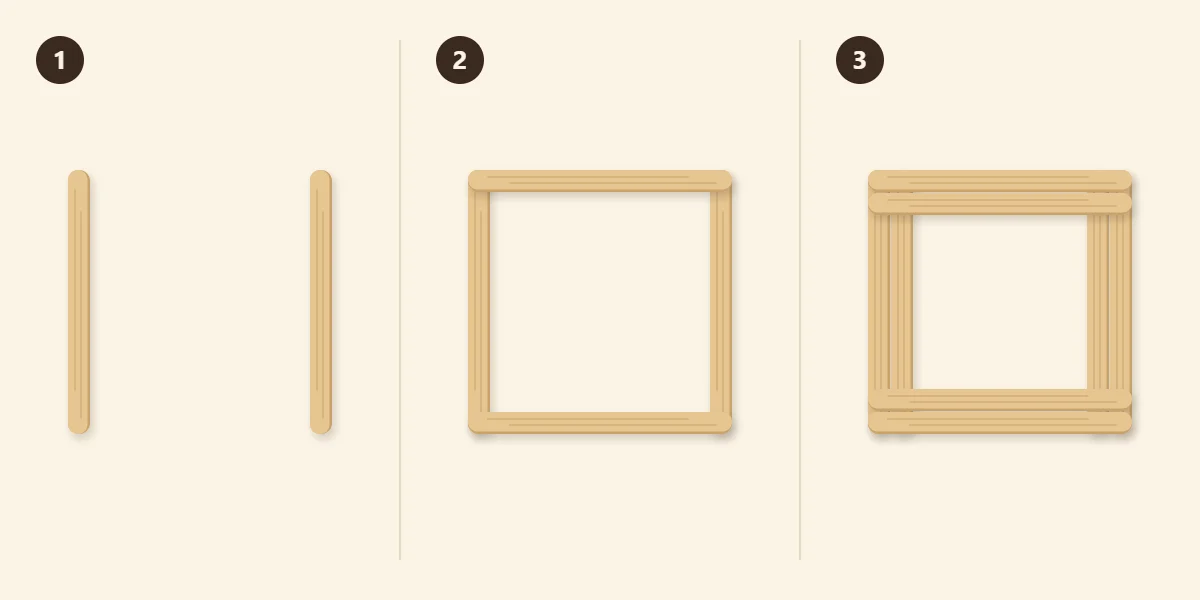
- Lay two upright sticks. Place two sticks vertical and parallel, about one stick length apart from outer edge to outer edge. Lay a spare stick across them to set the spacing: its ends should sit flush with their outer edges.
- Glue two sticks across the ends. Put a small dab of glue on the top and bottom end of each upright. Press one stick across the top ends and one across the bottom ends, so the four sticks form a square with overlapped corners. Before the glue grabs, line one corner up with the paper corner and nudge the sticks until two sides follow the paper’s edges exactly. Clip each corner with a clothespin and leave it until the glue has set.
- Add a second round of four sticks. Glue two more sticks across the uprights, each one snug against the inside edge of a crosswise stick. Then turn the frame over and glue the last two sticks beside the first two uprights, on the inside, resting across the ends of the crosswise sticks. Every side of the square is now two sticks wide.
Wipe away squeeze-out as you go, clip the new sticks and leave the frame flat until the glue has set, as the label directs.
The Photo Pocket, Hanger and Stand
Turn the frame face down. Decide which edge is the top, then add the back in this order.
- Card pocket. Run a narrow line of glue along the left, right and bottom edges of the card rectangle, keeping it within about 1/4 in (6 mm) of the edge. Leave the top edge bare. Center the card over the opening and press the three glued edges down. The frame is built in two layers, so press until the card also touches the lower sticks. The top stays open like a pocket.
- Twine loop. Fold the twine into a loop and glue both ends to the back of the frame at the top center, above the pocket opening. Press a small scrap of card over the ends to hold them.
- Stick strut. For a frame that stands on a shelf, glue one end of a single stick to the back at the bottom center so that it angles out behind the frame like a kickstand. Prop it in position until the glue has set. Wood glue gives this joint a firmer hold.
Use the loop, the strut or both. Trim the photo to about 3.5 in (9 cm) square: wider than the opening so its edges are hidden, but narrow enough to slide between the glue lines. Slip it in from the top, picture side toward the opening.
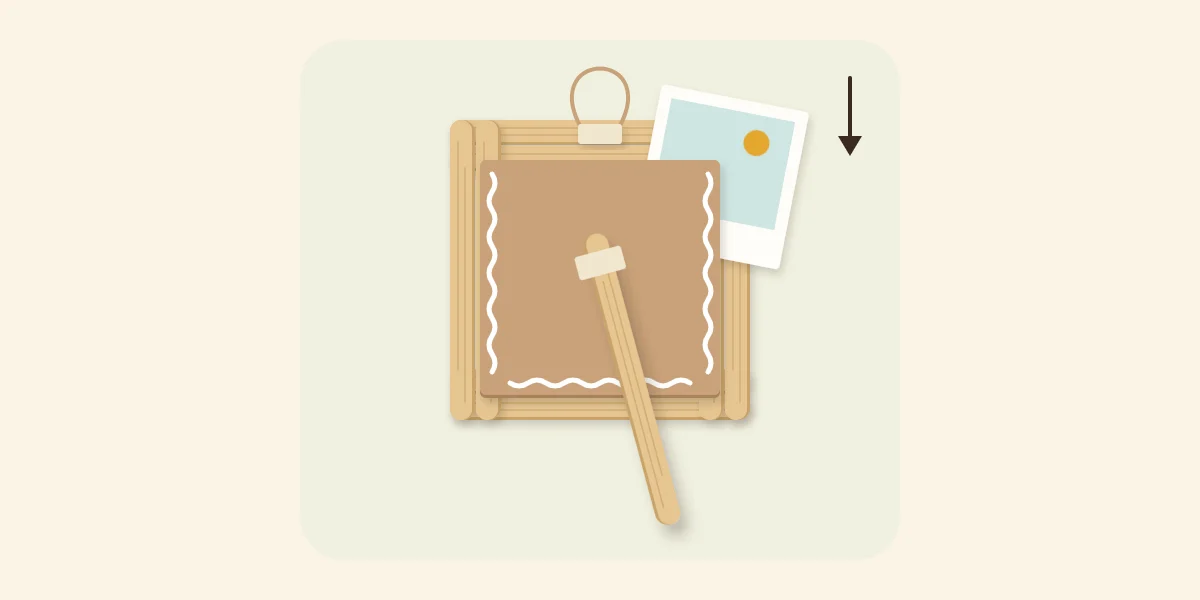
Photo Sizes and Frame Styles
The same method works with jumbo sticks, about 6 in long and 3/4 in wide (15 cm x 1.8 cm). Cut the card a little smaller than the frame in each case.
| Photo size | Sticks per side | Frame style |
|---|---|---|
| About 3.5 in (9 cm) square | 2 (8 sticks) | Standard sticks, doubled sides |
| About 5 in (12.7 cm) square | 1 (4 sticks) | Jumbo sticks, single sides |
| About 3.5 in (9 cm) square | 2 (8 sticks) | Jumbo sticks, wide border |
Decorating the Frame
Sand any rough ends before decorating. Acrylic craft paint in thin coats works well on an assembled frame; paint the front and the inner and outer edges, and leave the back bare. For a wood-toned finish that keeps the grain visible, see the methods for staining craft sticks with wood stain, watercolor or marker.
Buttons glued in a small cluster at one corner add color without covering the photo. Use tacky glue and press each button until it grabs.
Watch out
Buttons are small parts. Keep them, and frames decorated with them, away from young children and pets.
Common Problems
- The frame is a diamond, not a square. The corners shifted before the glue set. Check against the paper corner at the first round, because the second round only locks in whatever shape is already there.
- The frame rocks on the table. One stick is bowed. Replace it during the dry layout, or weight the frame flat under a book over wax paper while the glue sets.
- The photo will not slide in. Glue spread too far in from the card edges. Trim the photo a little narrower.
Variations
Paint each round a different color before assembly for a two-tone border. The same idea at a smaller scale, with a magnet on the back, becomes a set of small framed photo magnets for the fridge.
Frequently asked questions
How many popsicle sticks do I need for a picture frame?
A square frame with each side two sticks wide uses eight standard craft sticks. Add one more if you want a stick strut so the frame can stand, and keep a few spares in case some sticks in the pack are bowed.
What size photo fits a popsicle stick picture frame?
With standard sticks and doubled sides the opening is roughly 3 in (7.5 cm) square, so trim the photo to about 3.5 in (9 cm) square. Packs vary, so measure your own opening first and cut the photo a little larger than it.
How do I keep a popsicle stick frame square?
Line one corner of the frame up with the corner of a sheet of paper while the glue is still soft, and adjust the sticks until two sides follow the paper's edges. Check again after clamping, because clothespins can pull a corner out of line.