Mini Popsicle Stick Chair and Table: A Simple Miniature Set
Build a decorative miniature table and chair from mini craft sticks, with a cutting list, a way to keep the legs equal and fixes for a set that rocks.

Tutorial at a glance
What you need
- About 15 mini craft sticks for the table and one chair (21 for two chairs)
- 2 standard craft sticks
- Tacky glue or white craft glue
- Sturdy scissors and warm tap water
- Sandpaper or an emery board
- Pencil, ruler and a piece of stiff card
- Wax paper and a small weight
This mini popsicle stick chair and table set is a decorative miniature: a table about 2 in (5 cm) tall with a slatted top, and a matching chair with a two-slat back. It is built almost entirely from mini craft sticks, which keeps the cutting to a handful of simple trims.
The method is the same for both pieces. Build the flat parts first, let each one set, then stand the legs up against a guide so they all end at the same height. Rushing that order is what produces a table that rocks.
What You Need
- About 15 mini craft sticks for the table and one chair, or 21 for the table and two chairs
- 2 standard craft sticks, cut up for the runners
- Tacky glue or white craft glue
- Sturdy scissors and a cup of warm tap water
- Sandpaper or an emery board
- Pencil, ruler and a piece of stiff card with a straight edge
- Wax paper and a small weight, such as a book
Craft sticks are popsicle sticks sold new in craft packs. Mini ones are about 2.5 in (6.4 cm) long, but packs vary, so measure yours and adjust the lengths below to match.
Cut the Pieces
All cuts follow the same routine: soften the stick in warm tap water, cut with sturdy scissors and sand the end square. The guide to cutting popsicle sticks cleanly shows the method in full. Wear eye protection, and have an adult do the cutting when making this with children.
| Part | Pieces | Length |
|---|---|---|
| Table top | 5 whole mini sticks | About 2.5 in (6.4 cm) |
| Table runners | 2, from a standard stick | About 1.5 in (3.8 cm) |
| Table legs | 4 trimmed mini sticks | About 2 in (5 cm) |
| Table braces | 4 leg offcuts | About 0.5 in (1.3 cm) |
| Chair back uprights | 2 whole mini sticks | About 2.5 in (6.4 cm) |
| Chair seat, slats, front legs | 7, from 4 halved mini sticks | About 1.25 in (3.2 cm) |
| Chair seat runners | 2, from a standard stick | About 1 in (2.5 cm) |
Four mini sticks cut in half give eight short pieces, so one is spare. Trimming the four table legs leaves four offcuts, and those become the braces. After each batch of cuts, stand the matching pieces side by side on the table and sand any that are taller than the rest.
Build the Chair
The chair has three sub-assemblies: a seat panel, a back and two front legs. The two back uprights also serve as the back legs, which is why they are left at full length.
- Seat. Lay three short pieces side by side, running front to back, and glue the two seat runners across them underneath, one near the front and one near the back. Weight it flat.
- Back. Lay the two whole mini sticks parallel, as far apart as the seat is wide. Glue two short pieces across the upper half as slats, one level with the top and one a little below it. Check the corners against the card.
- Join seat and back. Once both parts have set, mark each upright halfway up, at about 1.25 in (3.2 cm). Glue the back edge of the seat against the uprights so its underside sits on the marks. Prop the seat on a stack of spare sticks until the glue holds.
- Front legs. Glue the last two short pieces upright under the front corners, each tucked behind the front runner with its top end against the underside of the seat.
For a matching pair, repeat the same cuts and steps with six more mini sticks and two more runners.

Build the Table
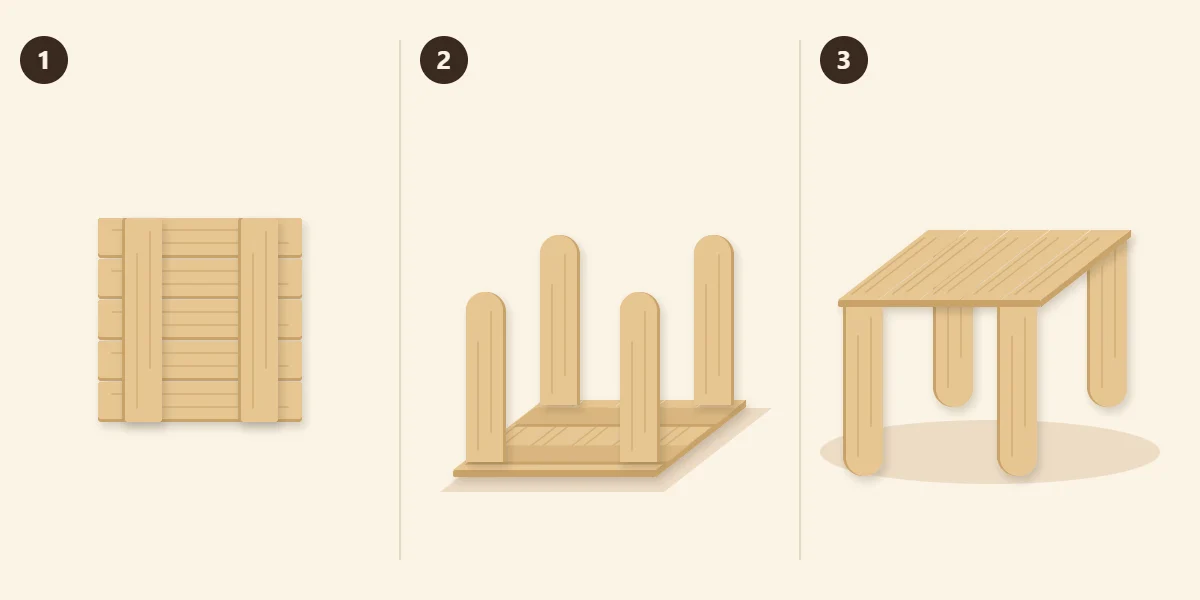
- Make the top upside down. Lay five whole mini sticks side by side on wax paper with their ends level against the ruler. Glue the two table runners across them, each about 1/2 in (1.3 cm) in from an end. Weight the top flat until the glue has set.
- Glue the four legs inside the corners. With the top still upside down, stand each leg upright just outside a runner, near its end, with the flat face of the leg against the runner’s edge and the foot of the leg glued to the underside of the top. Then lay a brace flat on the underside, tight against the other face of the leg, so the leg is held between the runner and the brace. Hold the card edge against each pair of legs to check they stand straight, and leave everything until the glue has set.
- Turn the table the right way up. Set it on a flat surface and press lightly on each corner. If it rocks, rub the feet on sandpaper laid flat until all four touch.
Tip
To keep legs equal, stand all four against a straight card edge before gluing, feet on the table, and compare the tops. A leg that is even slightly long shows at once, and it is far easier to sand a loose piece than a glued one.
Common Problems
- The table rocks. One leg is longer or leans. Sand the feet together on flat sandpaper.
- A leg falls over while the glue is wet. Tacky glue grips sooner than thin white glue. Hold the leg briefly, then set the brace against it.
- The chair tips backward. The seat was glued too low on the uprights, so the front legs are too long. Sand the front legs a little.
- The seat slopes. The two pencil marks on the uprights are at different heights. Mark both uprights together in one pass.
Finishing and Display
Leave the set natural, or paint the chair seat in a bright color and keep the rest plain. Paint lightly so the small panels stay flat. The set suits a shelf scene, and it stands well beside a mini two-tier shelf or in front of a decorative popsicle stick cottage.
Watch out
This is a display piece with small parts that can come loose, not a toy for young children. Keep it out of reach of small children and pets.
Frequently asked questions
How do you keep miniature table legs the same length?
Stand all four legs against a straight card edge with their feet on the table and compare the tops before gluing. Sand any leg that stands taller than the others. If the finished table still rocks, rub all four feet together on sandpaper laid flat.
Can this set be made from standard popsicle sticks only?
Yes, but it means more cutting, because every piece is shorter than a standard stick. Mini sticks are already close to the lengths needed, so only the legs and the short chair pieces are trimmed. If you cut standard sticks, soften them in warm tap water first and sand each end.
Is a mini craft stick chair and table a toy?
No. It is a decorative display piece with small glued parts that can come loose. Keep it out of reach of young children and pets.