How to Make a Popsicle Stick Box with a Lid
Build a square box from whole craft sticks with a flat base panel, log-cabin stacked walls and a lift-off lid that locates inside the walls. No cutting needed.

Tutorial at a glance
What you need
- About 52 standard craft sticks for a box about 1 in (2.5 cm) deep with a lid, plus spares
- White craft glue, tacky glue or wood glue
- Square corner cut from stiff card
- One wooden bead or flat button
- Wax paper or baking parchment
- Heavy book and a few clothespins
- Fine sandpaper or an emery board
- Acrylic craft paint and a brush (optional)
The classic popsicle stick box is built like a tiny log cabin: a flat square base, then pairs of sticks stacked crosswise on alternate sides until the walls are as tall as you want. Every part is a whole standard craft stick, so there is no cutting, and the lid is simply a second panel with two sticks underneath to keep it in place.
Because the walls grow one layer at a time, the same method makes a shallow tray or a deeper keepsake box. The only decision is how many layers to stack, and the table below helps you count the sticks before you start.
What You Need
- About 52 standard craft sticks for a box about 1 in (2.5 cm) deep with a lid, plus spares
- White craft glue or tacky glue, or wood glue for stronger wall joints
- A square corner cut from stiff card
- One wooden bead or a flat button for the knob
- Wax paper or baking parchment
- A heavy book and a few clothespins
- Fine sandpaper or an emery board
- Acrylic craft paint and a brush (optional)
How Many Sticks to Count Out
The base panel takes 14 sticks: 12 side by side plus 2 cross sticks. The lid takes another 14. The walls use 2 sticks per layer, and each layer adds one stick thickness, roughly 1/12 in (2 mm), to the height.
| Box depth | Layers | Wall sticks |
|---|---|---|
| About 1/2 in (1.3 cm), low tray | 6 | 12 |
| About 1 in (2.5 cm) | 12 | 24 |
| About 2 in (5 cm), deeper box | 24 | 48 |
Add 28 to the wall figure for the base and lid: 24 wall sticks plus 28 gives the 52 in the materials list. These depths are estimates, because stick thickness varies between packs and each glue line adds a little. Rather than trusting the numbers, stack a few dry sticks from your own pack, measure the pile, and count pairs as you build until the walls reach the height you want.
Make the Base Panel
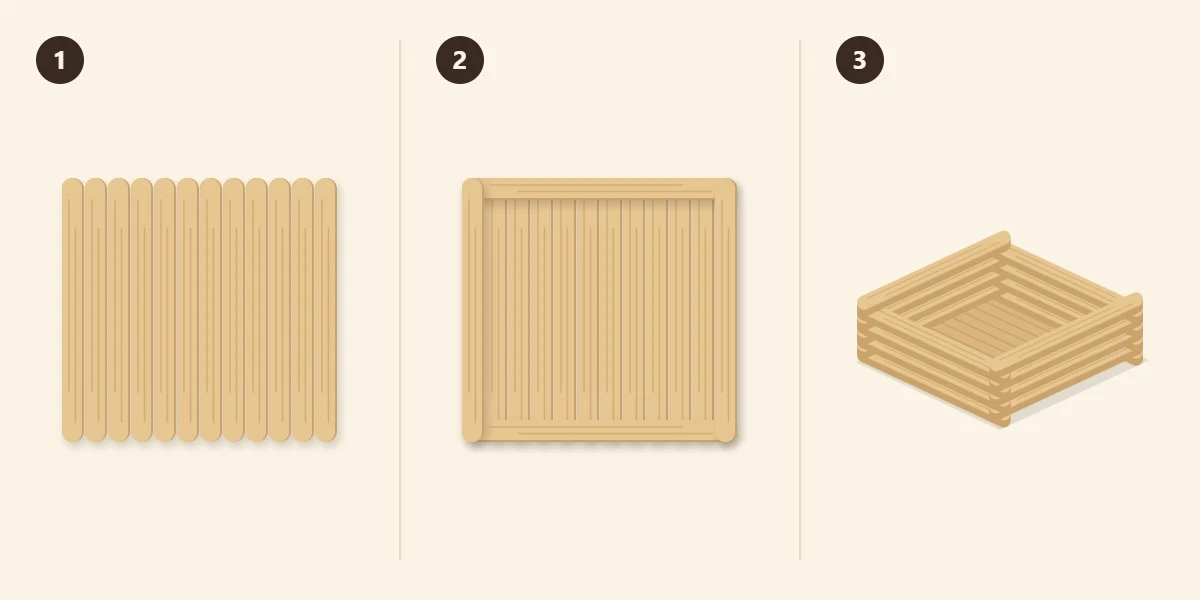
Lay 12 sticks side by side on wax paper with their ends lined up against a ruler. Together they form a square about 4.5 in (11.4 cm) on each side, as wide as one stick is long. Run a line of glue along 2 cross sticks and press them across the panel at right angles, each about 1/2 in (1.3 cm) in from an end, making sure they touch all twelve sticks.
Cover with wax paper, set a heavy book on top and leave it until the glue has set. Then turn the panel over. The cross sticks are now underneath, where they act as low feet, and the smooth face is the floor of the box. The guide to craft stick joints and how to reinforce them covers cross sticks in more detail.
Stack the Walls
- Start with the base. Set the finished base panel smooth side up on wax paper.
- Glue the first two pairs. Glue 2 sticks flat along two opposite edges of the base, lying across the ends of the base sticks so they tie the panel together. Then glue 2 more sticks across their ends, along the other two edges, to complete the first square. Each of these rests on the pair below only at the corners, which leaves a gap one stick thick beneath it.
- Keep stacking. Repeat, always placing the new pair directly above the pair two layers down, with a dot of glue at each corner. Continue until you have the number of layers you chose, and the alternating gaps of log-cabin stacking appear on every side.
Hold the square card corner upright against each outside corner every few layers. Stacked walls drift easily: one stick placed slightly off pushes the next one further, and the box ends up leaning or twisted. Nudge the sticks back into line while the glue is still soft.
If you are unsure which adhesive suits a box that will be handled often, the comparison of white glue, wood glue and tacky glue for craft sticks explains the trade-offs.
Tip
Build the walls in stages of four or five layers and let each stage firm up before adding the next. Fresh glue is slippery, and a tall wet stack slides out of square under its own pressure.
Make the Lid
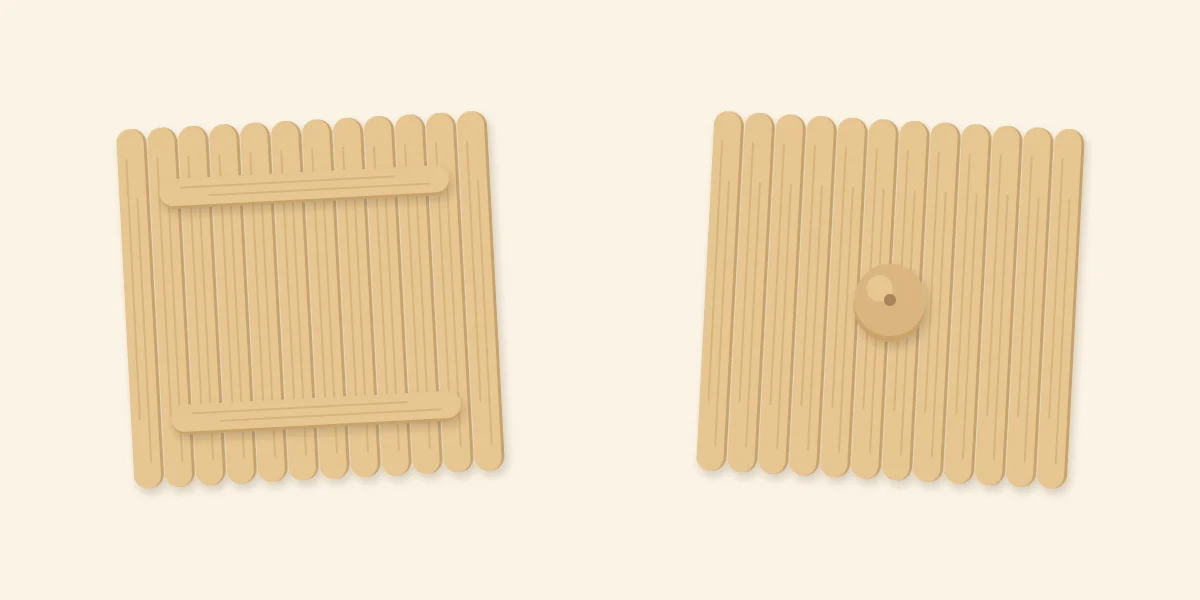
Lay out a second panel of 12 sticks on wax paper, exactly like the base. This time the 2 cross sticks do double duty as locating sticks: they hold the panel together and also drop inside the box walls to stop the lid from sliding.
Before gluing, check which way the lid must face. Look at the top of the box: the last pair of wall sticks sits on two opposite edges. The locating sticks need to run parallel to that pair and lie just inside it, so set each one about 1/2 in (1.3 cm) in from the lid edge. Their ends then rest in the gaps beside the top pair. Do a dry fit by holding the two sticks in place on the box, then glue them across the lid panel and press under a book until the glue has set.
Turn the lid over and glue the wooden bead or button in the center of the top as a knob. The locating sticks keep the lid from shifting side to side; it lifts straight up by the knob.
Common Problems
- The walls lean or twist. Layers were stacked without checking. Use the card corner often and work in stages.
- The lid rocks. One top stick is bowed, or the lid panel dried without weight on it. Press panels flat under a book, and choose straight sticks for the last two layers.
- The lid will not seat. The locating sticks are too close to the edge and land on the walls. Dry fit before gluing and move them inward.
- Corners come apart. There was too little glue. Reglue the corner and clamp it with a clothespin.
Finishing and Variations
The gaps between layers are part of the look, so there is no need to fill them. Sand any rough stick ends lightly, then leave the wood natural or add color. Painting just the top layer and the knob gives a neat accent. The box suits small, light objects such as paper clips or folded notes; keep beads, buttons and other small parts away from young children and pets.
Once log-cabin stacking feels familiar, a small slatted gift tray for presents is a natural next build.
Frequently asked questions
How many popsicle sticks does it take to make a box?
The base and lid each use 14 sticks, and the walls use 2 sticks per layer. A box about 1 in (2.5 cm) deep has roughly 12 layers, so about 52 sticks in total. Stick thickness varies, so stack a few of your own and measure before settling on a number.
How do I keep the box walls straight?
Hold a square corner of stiff card against each outside corner every few layers and nudge the sticks back into line while the glue is soft. Build in stages of four or five layers and let each stage firm up before adding more. A tall stack of wet glue slides out of square easily.
How does the lid stay on a popsicle stick box?
Two locating sticks are glued across the underside of the lid, set in from the edges. They sit just inside the top pair of wall sticks and stop the lid from shifting sideways. The lid is not fastened, so it lifts straight off by its knob.