Popsicle Stick Planter Box: A Decorative Holder for Small Pots
Build a square craft stick sleeve with slatted walls and bead feet that hides a small potted plant on its saucer. For indoor display only.

Tutorial at a glance
What you need
- About 80 standard craft sticks for a 2.5 in (6.5 cm) pot, more for taller pots
- Wood glue, or white craft glue or tacky glue
- 4 round wooden beads, about 1/2 in (1.2 cm) across, for feet
- Wax paper or baking parchment
- A heavy book to use as a weight
- Fine sandpaper or an emery board
- Optional water-based stain or acrylic craft paint
- A small pot with a saucer
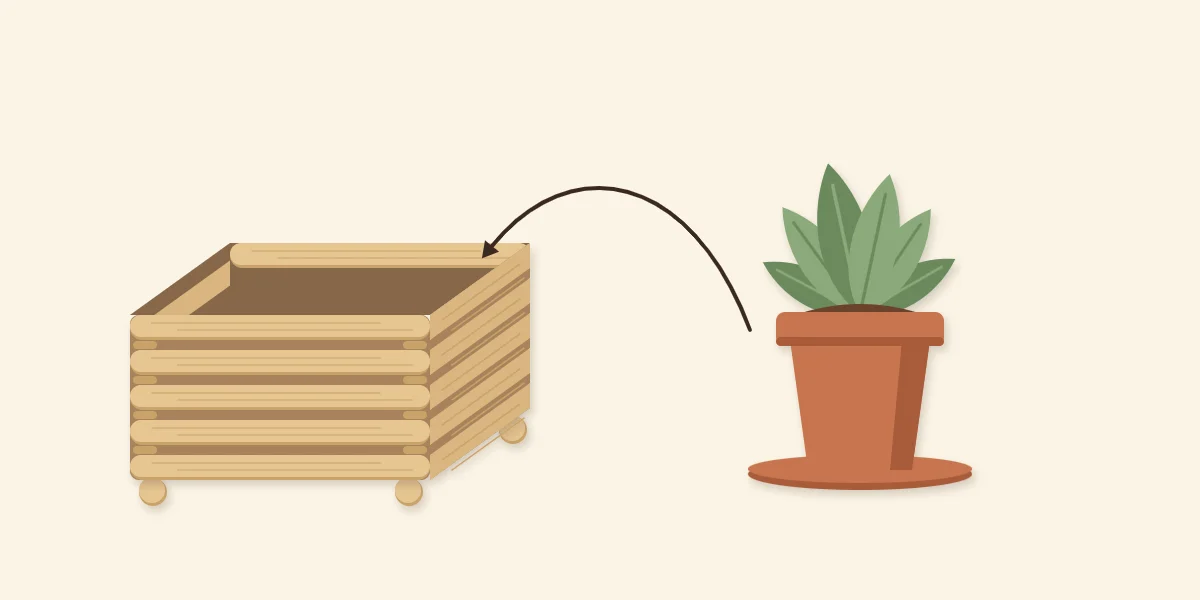
A plain plastic or terracotta pot looks more finished inside a wooden sleeve, and a popsicle stick planter box is one of the easiest sleeves to make. It is a square, open-topped box with slatted walls and four small feet, sized to hide a small pot.
One point shapes the whole design: this is a decorative outer holder, sometimes called a cachepot, not a container for soil or water. The plant stays in its own pot, the pot stands on a saucer, and both sit inside the box. Thin wood and craft glue do not cope with standing water, so the box is built to stay dry and is meant for indoor use.
How the Planter Works
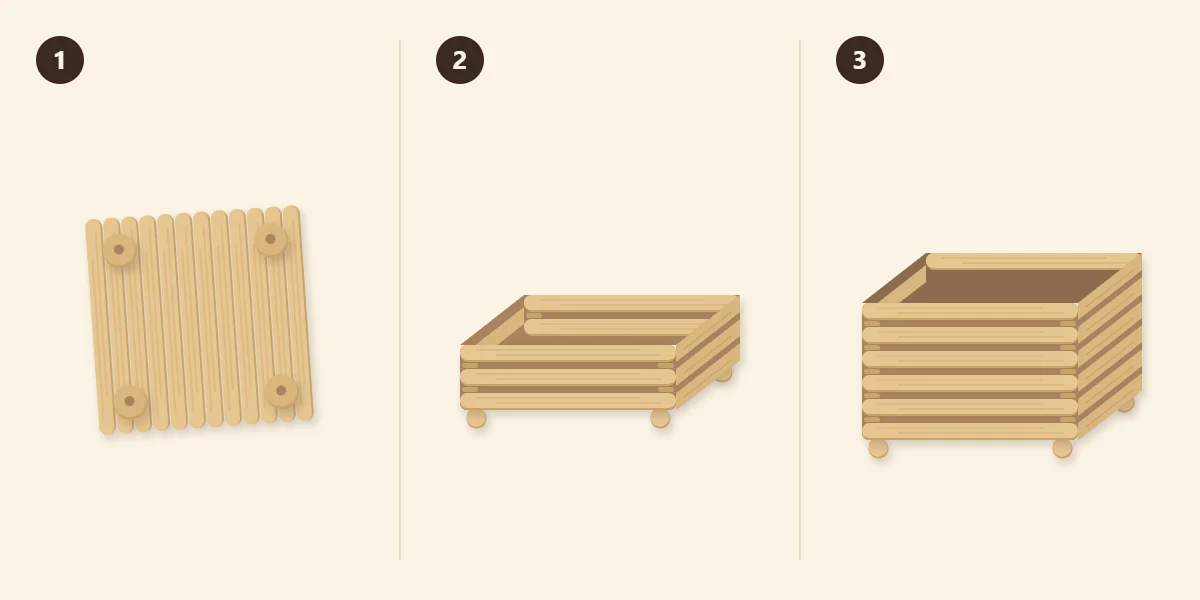
The box has three parts. The base is a flat panel of twelve craft sticks held together by two cross sticks. The walls are built by log-cabin stacking, pairs of sticks laid on alternate sides, which leaves narrow gaps that let air through. Four feet lift the base off the shelf so air can move underneath as well.
When the plant needs water, lift the pot out, water it at the sink and let it drain fully before putting it back on its saucer in the box. A faux plant skips that routine entirely.
Sizing the Box to Your Pot
Twelve standard craft sticks side by side are about 4.5 in (11.4 cm) wide, the same as one stick is long, so the base comes out square. The walls take up one stick width on each side, leaving an opening about 3.75 in (9.5 cm) across. Measure your pot and saucer together at the widest point; they should drop in with a little room to spare.
For the height, count layers against the pot. Each layer is one pair of sticks and adds one stick thickness, so a wall needs about twelve layers for every inch (2.5 cm) of height. Stand the pot on its saucer, measure from the table to the rim, and build until the walls reach that height or sit just below it.
| Pot width | Box size | Layers |
|---|---|---|
| About 2 in (5 cm) | Standard sticks, 4.5 in (11.4 cm) square | About 24 |
| About 2.5 in (6.5 cm) | Standard sticks, 4.5 in (11.4 cm) square | About 30 |
| About 3 in (7.5 cm) | Standard sticks, a snug fit with a saucer | About 36 |
| About 4 in (10 cm) | Jumbo sticks, about 6 in (15 cm) square | Count against the pot |
The layer counts assume a pot roughly as tall as it is wide and sticks about 1/12 in (2 mm) thick. Packs vary, so trust the pot, not the table.
What You Need
- About 80 standard craft sticks for a pot 2.5 in (6.5 cm) wide: 12 for the base, 2 cross sticks and about 60 for the walls, plus spares
- Wood glue, or white craft glue or tacky glue
- 4 round wooden beads, about 1/2 in (1.2 cm) across, for the feet
- Wax paper or baking parchment
- A heavy book to use as a weight
- Fine sandpaper or an emery board
- Optional: water-based stain or acrylic craft paint, and a brush
- A small pot with a saucer that fits inside
Base, Feet and Walls
- Make the base and add the feet. Lay twelve sticks side by side on wax paper and square up the ends against a ruler. Glue two cross sticks across them, each about 1/2 in (1.2 cm) in from an edge, and press under a heavy book until the glue has set. These cross sticks end up inside the box, where the saucer rests on them. Turn the panel over and glue a bead near each of the four corners, about 1/2 in (1.2 cm) in from both edges, with the bead holes pointing up and down so the flat ends make contact. Leave the base upside down until the feet are firm.
- Start the walls. Stand the base on its feet. For the first layer, glue two sticks along the two edges that run across the base sticks, just outside the cross sticks, so this layer also helps tie the base together. For the second layer, glue two sticks along the other two edges with their ends resting on the ends of the first pair. Add a third layer above the first. Check from above that the corners form a square.
- Build to full height. Keep adding pairs on alternate sides, with a small dot of glue at each corner, until the walls reach the rim of your pot.
If stacked walls are new to you, the instructions for a popsicle stick box with a lid show how to keep a stack square.
Tip
Stand the pot and saucer in the box after every ten layers or so to judge the height against the real pot.
Staining or Painting the Outside
A walnut or gray stain suits this box and keeps the grain visible. Because the walls are full of gaps, it is far easier to color the wall sticks before stacking; the guide on staining craft sticks with stain, washes or markers shows how to do a batch evenly. Thin coats of acrylic craft paint work too.
Apply any clear sealer as its label directs, in a ventilated room. Do not expect any finish to make the box suitable for outdoor use or for holding water; treat it as indoor decor and wipe up drips promptly.
Common Problems
- The box rocks on its feet. One bead sits lower than the others. Rub that foot gently on sandpaper laid flat, or add a small felt pad under the short one.
- The walls spiral as they rise. Each pair was placed slightly off the one below. Line every stick up with the stick two layers down, and check from above often.
- The pot will not fit. The saucer is wider than the opening. Use a smaller saucer, or rebuild with jumbo sticks for a larger box.
- Dark marks appear on the base. The pot went back in while still dripping. Let it drain longer at the sink and dry the saucer first.
Variations
Paint only the top two layers for a colored rim, or alternate natural and stained pairs for stripes. For a matching detail, add a label from the tutorial on popsicle stick plant markers and push it gently into the soil beside the stem. Keep the planter away from candles and heat sources, and keep bead feet and other small parts away from young children and pets.
Frequently asked questions
Can I put soil directly in a popsicle stick planter?
No. The box has gaps in its walls and is made of thin wood and craft glue, so it is not a container for soil or water. Keep the plant in its own pot on a saucer inside the box, and lift it out to water it.
How tall should the walls of the planter box be?
Build the walls up to the rim of the pot or just below it. Each pair of sticks adds one stick thickness, which works out to about twelve layers for every inch (2.5 cm) of height with typical craft sticks. Test with the real pot and saucer as you go.
Can a popsicle stick planter go outside?
It is best kept indoors. Craft sticks swell, discolor and soften when they stay damp, and no finish described here should be assumed to change that. Use it on a shelf or windowsill with a pot that has been drained before it goes back in.


