Popsicle Stick Photo Display: A Hanging Ladder with Mini Clips
A hanging ladder made from about 13 craft sticks, with lap-jointed rails, five rungs and a twine hanger. Photos clip to the rungs with mini clothespins, so no glue touches the prints.

Tutorial at a glance
What you need
- About 13 standard craft sticks, plus spares
- Wood glue or tacky glue
- Clothespins for clamping
- Pencil, ruler and paper
- Wax paper or baking parchment
- Sturdy scissors and fine sandpaper
- Twine
- Mini clothespins
- Stain or acrylic craft paint (optional)
This popsicle stick photo display is a small hanging ladder: two long rails, five rungs and a twine loop at the top. Photos and cards hang from the rungs on mini clothespins, so nothing is glued to a print and the pictures can be swapped whenever you like.
The ladder uses about 13 standard craft sticks and is roughly 12 in (30.5 cm) long. A single stick is far too short for a rail, so most of the work is in joining sticks end to end and keeping two long, thin rails straight and parallel.
What You Need
- About 13 standard craft sticks, each about 4.5 in (11.4 cm) long, plus spares
- Wood glue or tacky glue
- Clothespins for clamping
- Pencil, ruler and a large sheet of paper
- Wax paper or baking parchment
- Sturdy scissors, warm tap water and fine sandpaper
- Twine, about 16 in (40 cm)
- Mini clothespins, one or two per photo
- Stain or acrylic craft paint, optional
New craft sticks are flatter and cleaner than washed food sticks, and flat sticks matter here because every joint is a face glued to a face.
Lap-Jointed Rails
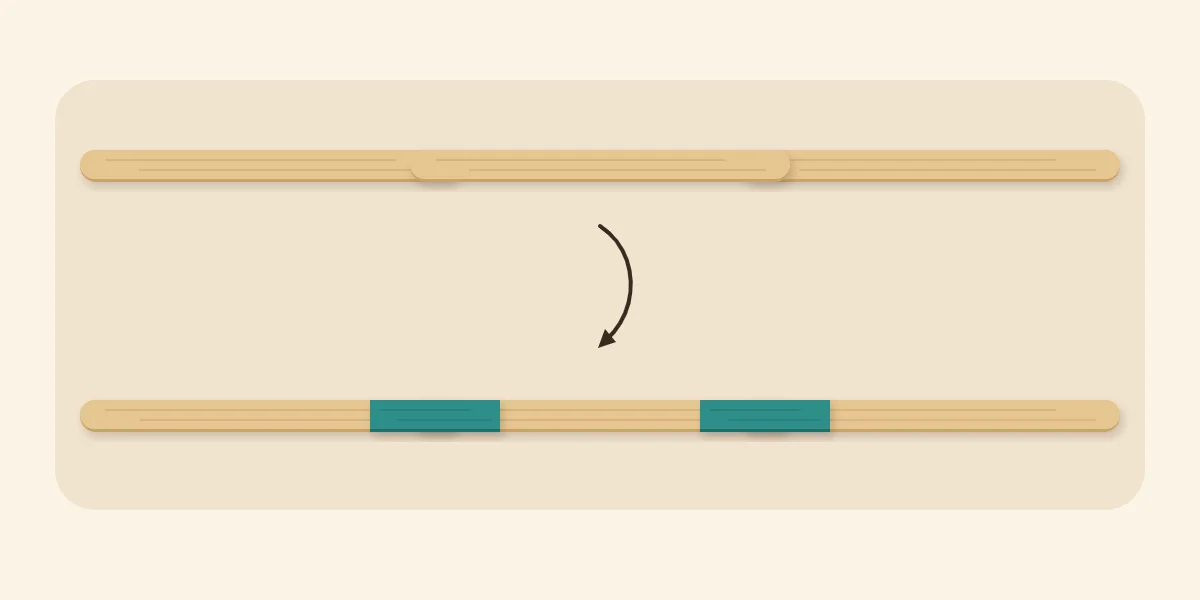
Each rail is three sticks in a line, joined with lap joints: the ends overlap and are glued face to face. Draw a straight pencil line about 13 in (33 cm) long on your paper, cover it with wax paper and build each rail along it.
Lay two sticks on the line with a gap between them, then bridge the gap with a third stick on top, overlapping each lower stick by about 3/4 in (2 cm). Three sticks with two overlaps give a rail about 12 in (30.5 cm) long. Glue both overlaps, sight along the guide line to check the rail is straight, and clamp each joint with a clothespin.
A lap joint on its own can still flex. To stiffen it, cut two spare sticks into four pieces about 1.5 in (3.8 cm) long. Soften the sticks in warm tap water, cut with sturdy scissors and sand the ends. Wear eye protection, and have an adult do the cutting if children are helping. Once the rails have set, turn them over and glue one short piece over each joint on the back. Use plenty of glue so it fills the small step where the sticks overlap, and clamp again.
Ladder Sizes and Stick Counts
The same method makes a shorter or longer ladder. Each extra stick in a rail adds one more joint to reinforce.
| Rails | Rungs | Sticks |
|---|---|---|
| 2 sticks each, about 8.25 in (21 cm) | 3 | 8 |
| 3 sticks each, about 12 in (30.5 cm) | 5 | 13 |
| 4 sticks each, about 15.75 in (40 cm) | 7 | 17 |
The totals include the sticks cut up for reinforcing pieces: one for the short ladder and two for the others. Count your own if you change the overlap.
Adding Rungs and the Hanger
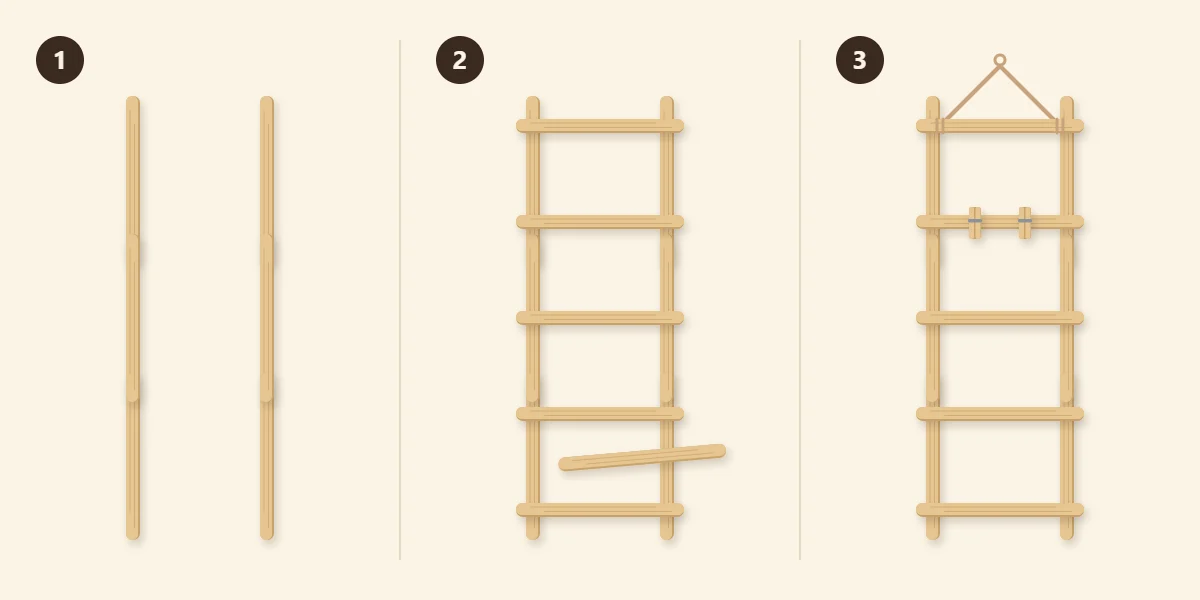
Draw two parallel lines 3.5 in (9 cm) apart on the paper. They keep the rails parallel while the rungs go on. If the rails drift, the ladder ends up tapered and hangs crooked.
- Set the rails. Lay the two rails on the guide lines, reinforced side down, with their ends level. Each rung will overhang the rails slightly at both ends.
- Glue five rungs. Glue the first rung across both rails about 1 in (2.5 cm) from the top. For even spacing, mark a spare stick 2 in (5 cm) from one end and lay it between the rungs as a spacer: butt its end against the rung you just glued and set the next rung at the mark. A strip of card cut 2 in (5 cm) wide works the same way. Repeat until all five rungs are on, then lay wax paper and a heavy book over the ladder until the glue has set.
- Add the hanger and clips. Tie the ends of the twine around the top rung, one just inside each rail, and add a dot of glue to each knot. Clip mini clothespins onto the rungs.
Tip
Check the ladder is square before the glue grabs: measure both diagonals from corner to corner. If the two measurements match, the rungs sit at right angles to the rails.
Stain or Paint
Finish the ladder after the glue has set and before the twine goes on, or untie the hanger first. A wood stain suits the ladder shape, and the guide to staining craft sticks with wood stain, watercolor or marker compares three ways to do it. Work in a ventilated room if you use stain or sealer. Glue that squeezed out of a joint will not take stain, so wipe squeeze-out while it is wet.
For paint, use thin coats of acrylic craft paint and let each one dry to the touch before the next. Painting only the rungs, or only the rails, gives a two-tone ladder with little extra work.
Hanging and Filling the Display
The finished ladder is light. Hang it from a small hook, or from a removable adhesive hanger used as that product directs. Clip each photo by its top edge to a rung. Small prints, about 2 in by 3 in (5 cm by 7.5 cm), fit between the rails; a larger print will cover the rung below, which is fine if you stagger them left and right.
Watch out
Mini clothespins are small parts. Hang the display out of reach of young children and pets, and keep it away from candles and other heat sources.
A ladder pairs well with other handmade decor on the same wall, such as a geometric sunburst made from craft sticks. For a single photo on a shelf or desk instead, a five-stick mini easel does the job with far fewer sticks.
Common Problems
- A rail bends at a joint. The overlap is too short or the reinforcing piece is missing. Add a short piece on the back and clamp it until set.
- The ladder hangs tilted. The twine knots are not the same distance from the rails. Slide one knot along the rung before gluing it.
- The ladder twists away from the wall. A rail warped as the glue dried. Press the ladder flat under a heavy book over wax paper while the joints set.
- Rungs are unevenly spaced. The spacer slipped. Hold it firmly against the last rung each time, and check with a ruler before the glue grabs.
Frequently asked questions
How do you join popsicle sticks end to end for a long rail?
Overlap the ends by about 3/4 in (2 cm) and glue them face to face, which is called a lap joint. Build the rail along a drawn straight line so it does not wander, clamp each joint, and glue a short piece of stick over the back of each joint to stiffen it.
How do you keep the rungs evenly spaced?
Use a gauge instead of measuring every gap. Mark a spare stick 2 in (5 cm) from one end, butt that end against the last rung and set the next rung at the mark. A strip of card cut to the same width works too.
Why use mini clothespins instead of gluing the photos on?
Clips hold a print by its edge without glue touching it, so the photo is not marked and can be swapped for another at any time. They also let you move pictures between rungs until the arrangement looks balanced.


