Popsicle Stick Hexagon Shelf: A Honeycomb Wall Display
Stack whole craft sticks three at a time over a hand-drawn template to build a honeycomb-style hexagon display for small, light objects.

Tutorial at a glance
What you need
- About 75 to 100 standard craft sticks for a shelf 2 in (5 cm) deep, depending on stick thickness
- White craft glue, tacky glue or wood glue
- Plain paper, pencil and ruler for the template
- Wax paper or baking parchment and tape
- A heavy book to use as a weight
- Fine sandpaper or an emery board
- Optional water-based stain or acrylic craft paint
A popsicle stick hexagon shelf is built by stacking, not by cutting: three sticks go down on alternate sides of a hexagon, three more bridge their ends, and the pattern repeats until the ring is deep enough to hold a small ornament. Every stick is used whole.
The result is a decorative display for small, light objects such as a pine cone or a tiny faux plant. Several grouped together read as a honeycomb.
What You Need
- A large pack of standard craft sticks: a shelf about 2 in (5 cm) deep takes roughly 75 to 100, depending on how thick your sticks are
- White craft glue or tacky glue, or wood glue for a stiffer bond
- A sheet of plain paper, a pencil and a ruler
- Wax paper or baking parchment, and tape to hold it down
- A heavy book to use as a weight
- Fine sandpaper or an emery board
- Optional: water-based stain or acrylic craft paint
Set aside any sticks that are bowed, twisted or split, because a curved stick lifts every layer above it.
Drawing the Hexagon Template
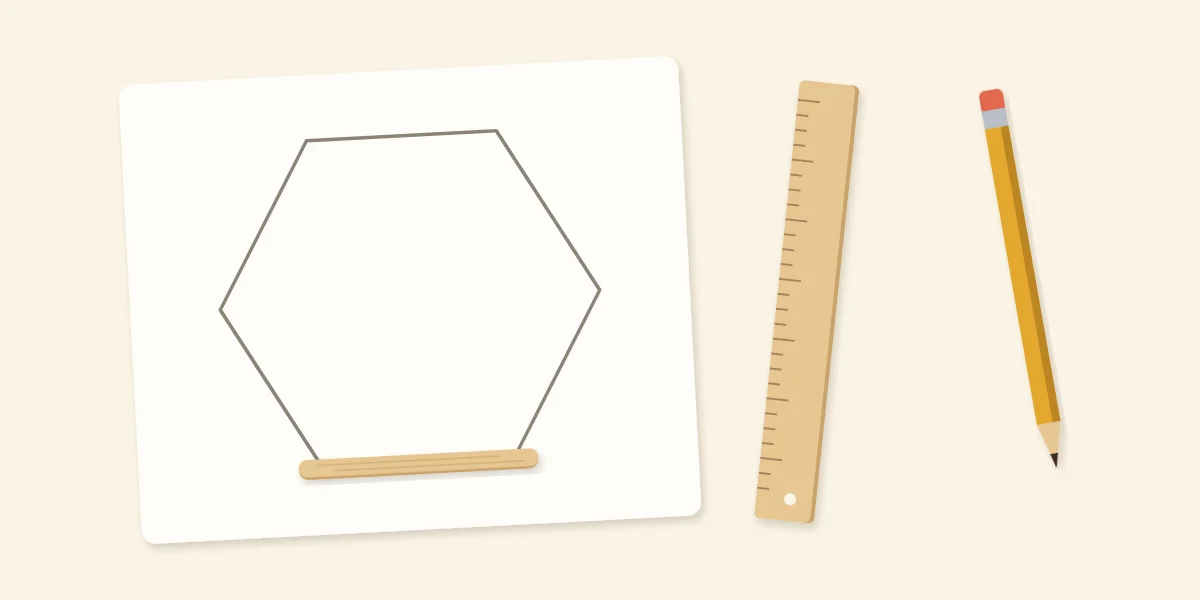
The template keeps every layer the same size. Its sides must be a little shorter than a stick, so that each stick runs past both corners and gives the next layer something to sit on. For standard craft sticks about 4.5 in (11.4 cm) long, a side of about 4 in (10 cm) works well and leaves roughly 1/4 in (6 mm) of overhang at each end. Measure your own sticks and shorten the side if they are smaller.
- Draw a line 8 in (20 cm) long across the middle of the paper and mark its center. The two ends are the first two corners.
- Draw two lines parallel to it, one about 3.5 in (8.8 cm) above and one the same distance below.
- On each of those lines, mark a point 2 in (5 cm) to the left and 2 in (5 cm) to the right of center. These are the other four corners.
- Join the six corners in order with the ruler, then measure all six sides. They should match; if one is long, nudge its corners and redraw.
Lay one stick along a side as a check. It should cover the pencil line and extend slightly beyond both corners. Tape wax paper over the drawing; the lines show through. The guide to joining and reinforcing craft stick structures explains why an overlapped corner is stronger than two ends that only touch.
Stacking in Alternating Layers of Three
This is log-cabin stacking adapted to six sides. Each layer has three sticks, and each layer sits on the ends of the one below.
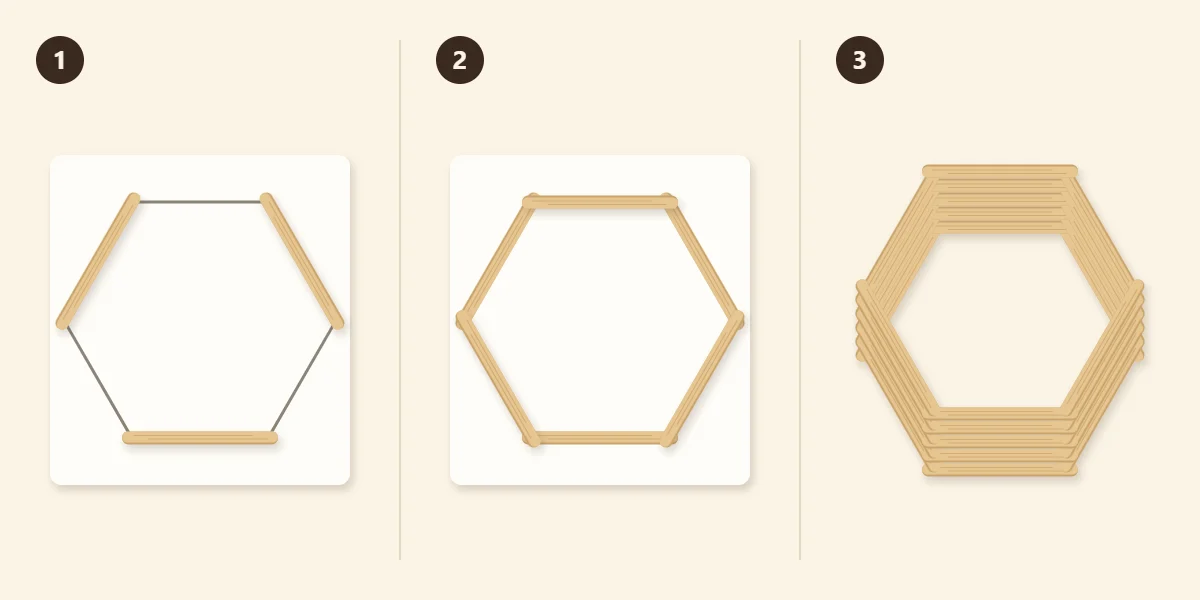
- Lay the first three sticks. Place a stick on every other side of the hexagon: sides one, three and five. No glue is needed yet. Center each stick on its line so the overhang is equal at both ends.
- Bridge with three more. Put a small dot of glue on both ends of each stick, then lay three sticks on the remaining sides, two, four and six, so their ends rest across the ends of the first three. The hexagon is now complete, two layers deep.
- Keep stacking. Dot glue on the ends of the top layer and add three sticks directly above the first three. Continue, always placing the new layer above the layer two below it, until the shelf reaches the depth you want.
Look straight down every few layers. The corners should rise as six vertical columns. If one starts to lean, slide the top sticks back into line before the glue grabs. After every eight to ten layers, lay wax paper and a heavy book on top and wait until the glue has set.
How Many Layers and Sticks
Each layer of three adds one stick thickness to the depth. Stack six sticks from your pack, measure the pile and divide by six to find the thickness of your own sticks; then divide the depth you want by that figure to get the number of layers, and multiply by three for the sticks.
| Depth | Layers | Sticks |
|---|---|---|
| About 1 in (2.5 cm) | About 12 | About 36 |
| About 1.5 in (3.8 cm) | About 18 | About 54 |
| About 2 in (5 cm) | About 24 | About 72 |
These figures assume sticks roughly 1/12 in (2 mm) thick. Many packs run thinner, and a 2 in (5 cm) shelf can then need close to a hundred sticks, so count layers as you go. Finish on an even number of layers so both faces show a complete ring.
Staining and Finishing
You can color the sticks before stacking or stain the finished ring. Staining first is tidier, because a brush cannot reach far into the gaps of a deep shelf; the guide on how to stain popsicle sticks explains how to do a batch without warping them. If you stain afterward, wipe away all squeeze-out while the glue is wet, since stain will not take over dried glue. For a group of three, try two in natural wood and one in a darker stain.
Standing or Hanging the Shelf
The simplest display is to stand the hexagon on one flat side on a desk or bookshelf. To hang it, use a removable adhesive hanger or a small hook suited to your wall, fitted exactly as that product directs, and rest the top inside edge of the ring over it.
Watch out
This is a decorative piece held together by small glue joints. Keep it for small, light objects, do not hang it above a bed or where it could fall on someone, and keep it away from candles and heat.
If you want a flat-bottomed display with a back panel instead, the mini shelf for small trinkets is a better shape for things that would roll in a hexagon.
Common Problems
- The ring twists as it rises. The sticks are drifting off the template. Check from above every few layers and line each new stick up with the one two layers below.
- Layers rock or leave uneven gaps. A warped stick is in the stack. Swap it out while the glue is wet and save bowed sticks for other projects.
- Corners come apart when handled. The ends overlap too little. Redraw the template with slightly shorter sides so each stick extends farther past the corner.
- The shelf leans when standing. The bottom side is not flat. Rub that side gently on a sheet of sandpaper laid on the table.
Frequently asked questions
How many popsicle sticks does a hexagon shelf need?
It depends on the depth of the shelf and the thickness of your sticks. Each layer uses three sticks and adds one stick thickness, so a shelf about 2 in (5 cm) deep usually takes somewhere between 75 and 100 standard craft sticks. Buy a large pack and count layers as you build.
How long should the sides of the hexagon template be?
Make each side a little shorter than your sticks so the ends overlap at the corners. For standard craft sticks about 4.5 in (11.4 cm) long, a side of about 4 in (10 cm) leaves a small overhang at each end. Measure your own sticks first, because pack sizes vary.
Can I hang a popsicle stick hexagon shelf on the wall?
Yes, as a decorative display for small, light objects only. Use a removable adhesive hanger or a hook suited to your wall and follow the directions for that product. The shelf can also simply stand on one flat side on a desk or bookshelf.


