Popsicle Stick Bridge: Building a Simple Truss Model
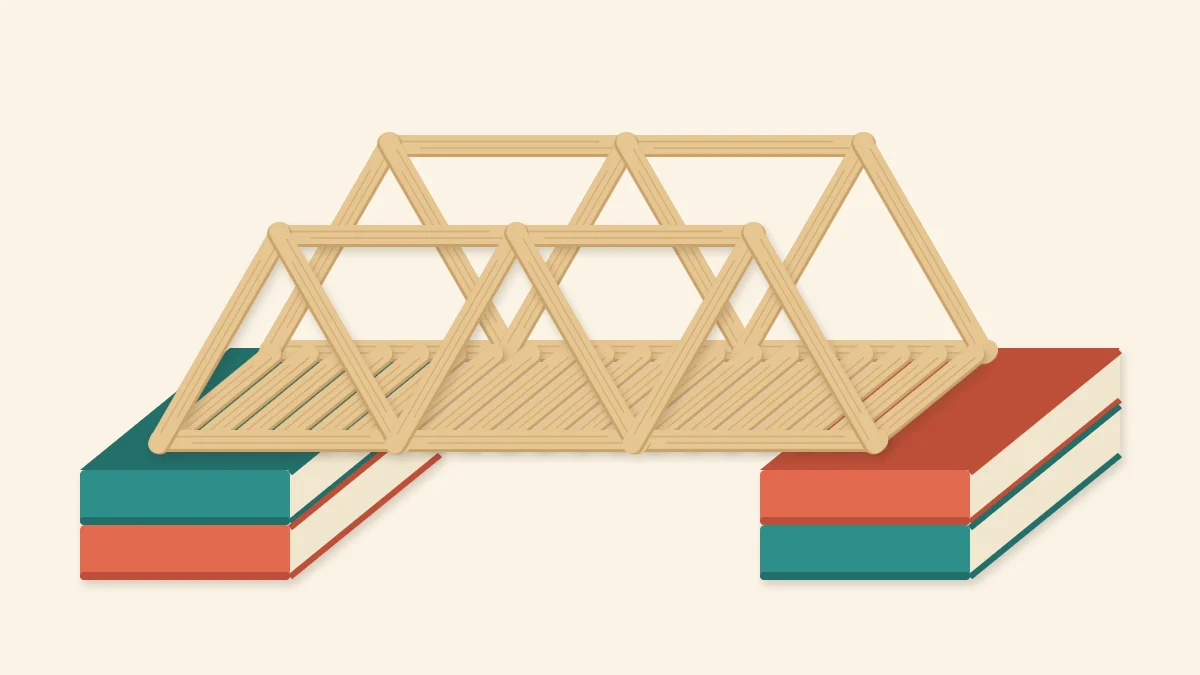
Build a small display truss bridge from whole craft sticks: two matching side trusses made flat on a template, then joined with cross sticks, a deck and top braces.
Tutorial at a glance
What you need
- About 45 standard craft sticks (41 in the model plus spares)
- Wood glue, or white craft glue or tacky glue
- Paper, pencil and ruler for the template
- Wax paper or baking parchment and tape
- Clothespins and a heavy book for clamping
- Two boxes or stacks of books to prop the trusses upright
Triangles are the whole idea behind a popsicle stick bridge. Join four sticks into a rectangle and you can push it sideways into a slanted shape with one finger; engineers call that racking. Join three sticks into a triangle and it keeps its shape, because no corner can move without a stick changing length. A truss is simply a row of triangles sharing sides.
This project is a small display model of a truss bridge, about 12.5 in (32 cm) long, made from whole craft sticks with no cutting. You build two identical side trusses flat on a template, stand them up, and tie them together with cross sticks, a deck and two top braces.
What You Need
- About 45 standard craft sticks: 41 for the model plus a few spares
- Wood glue, or white craft glue or tacky glue
- Two sheets of paper taped end to end, a pencil and a ruler
- Wax paper or baking parchment, and tape
- Clothespins and a heavy book for clamping
- Two boxes or stacks of books to hold the trusses upright
Pick the straightest sticks for the chords. The comparison of glues for craft sticks explains the choices; wood glue is the usual pick for structural joints like these.
The Parts of a Truss
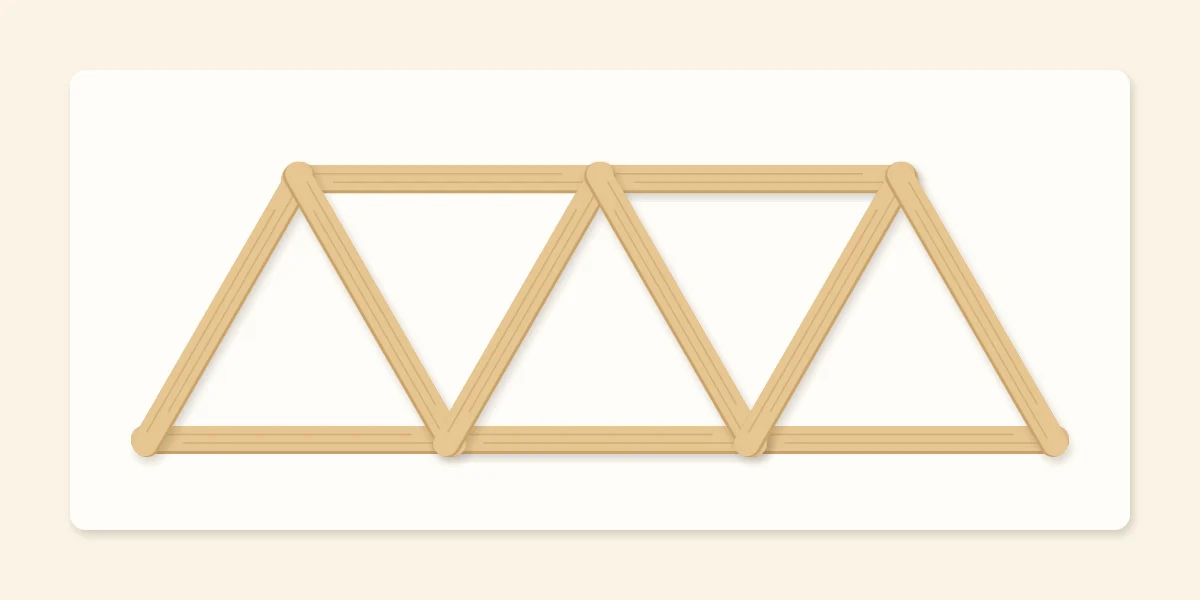
Each side truss has three kinds of member. The bottom chord is the long line along the base. The top chord is the shorter line above it. The diagonals zigzag between the two and turn the space into triangles. In this model the bottom chord is three sticks long, the top chord is two, and six diagonals make five triangles.
| Part | Sticks | Joint used |
|---|---|---|
| Bottom chords | 6 (3 per truss) | Lap joint |
| Top chords | 4 (2 per truss) | Lap joint |
| Diagonals | 12 (6 per truss) | Ends overlapped on the chords |
| Bottom cross sticks | 3 | Flat under both chords |
| Deck sticks | About 14 | Flat under both chords |
| Top braces | 2 | Flat across both top chords |
A lap joint means the ends of two sticks overlap and are glued face to face, which gives far more glue area than two ends that only touch. The guide to popsicle stick joints shows each type in detail.
Drawing the Template
Both trusses are built over the same drawing. These measurements suit sticks about 4.5 in (11.4 cm) long; measure yours and adjust.
- Draw a baseline about 12.5 in (32 cm) long. Starting 1/4 in (6 mm) from the left end, mark four points along it, each 4 in (10 cm) from the last.
- Draw a second line parallel to the first, about 3.5 in (8.8 cm) above it.
- On the upper line, mark three points, each one directly above the middle of a gap between two baseline points.
- Join the points in a zigzag: up from the first baseline point to the first upper point, down to the second baseline point, and so on to the far end. You should count six slanted lines and five triangles.
Tape wax paper over the drawing. To change the length or height, the article on planning a project with sketches and stick counts explains how to rework a template without running short of sticks.
Building One Side Truss Flat
- Lay the bottom chord. Place two sticks on the baseline with a gap between them, then glue a third over the gap so it laps about 1/2 in (1.2 cm) onto each. The laps should sit on the two middle points.
- Lay the top chord. Glue two sticks along the upper line, lapping their ends about 1/2 in (1.2 cm) over the middle upper point.
- Dry fit the diagonals. Set all six sticks on the zigzag lines without glue. Each end should overlap a chord at a marked point.
- Glue the diagonals. Lift one at a time, put a dot of glue where it crosses each chord, and press it back. Wipe away squeeze-out with a damp brush.
- Clamp and wait. Cover the truss with wax paper and a heavy book, and leave it until the glue has set fully, as its label directs.
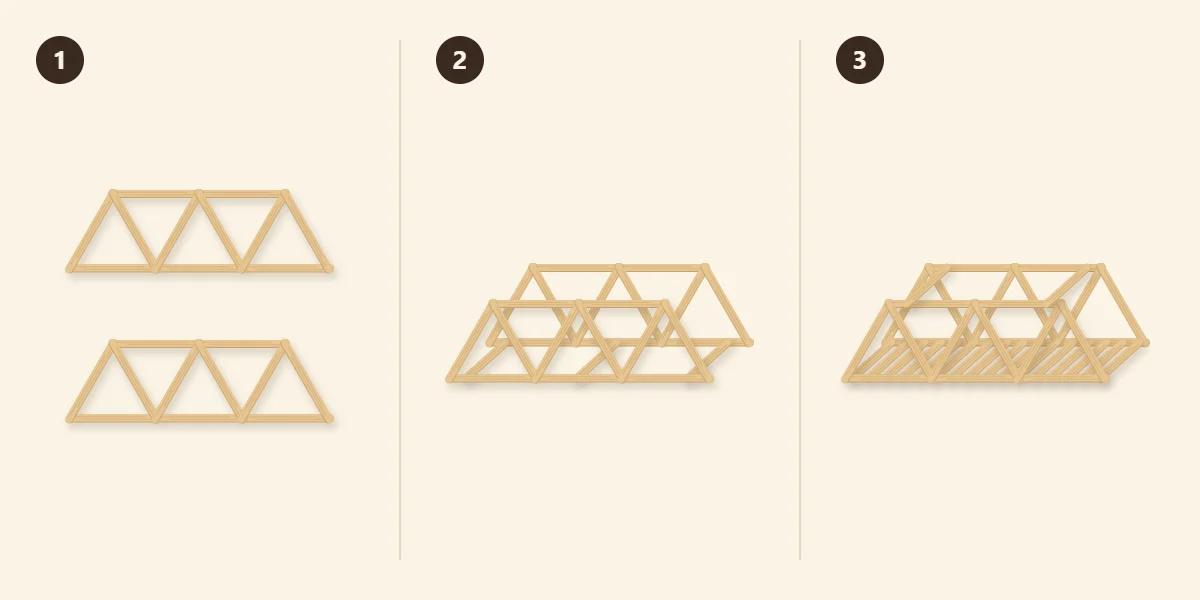
Build the second truss on the same template in the same order, then hold the two together to check that they match.
Joining the Two Trusses
Wait until both trusses are firm. One that is moved too soon shifts out of shape, and the error is locked in once the cross sticks go on.
- Set out the cross sticks. Lay three sticks on wax paper, parallel to one another: one for each end of the bridge and one for the middle.
- Stand the trusses up. Put a line of glue near both ends of each cross stick and stand the trusses on them, bottom chords down, about 3.75 in (9.5 cm) apart. Prop a box or a stack of books against the outside of each truss so both stand upright and parallel. Leave until the glue has set.
- Add the top braces and the deck. Glue two sticks flat across the top chords, one near each end. When those have set, turn the bridge over and glue the deck sticks across the underside of the bottom chords, filling the spaces between the cross sticks with a gap of about one stick width between them. Turn the bridge upright once the glue has set.
Tip
Check that the trusses are upright by standing a hardcover book on end beside each one. The truss should touch the cover from bottom chord to top chord.
Common Problems
- The trusses do not match. One was built off the lines. Always work over the same template and check the points before the glue grabs.
- The bridge leans to one side. The trusses were not propped upright while the cross sticks set. Brace both sides next time and check with a book.
- A diagonal pops off. Its end overlapped the chord too little, or the glue was moved while wet. Reglue with a larger overlap and clamp with a clothespin.
- The bridge rocks on the table. One cross stick sits lower than the others. Rub the underside gently on sandpaper laid flat.
Finishing and Display
Left natural, the model shows off its structure well. For a painted finish, a single color such as gray or deep red makes the triangles stand out.
Watch out
This is a display model. Do not stack objects on it or press on it to find out how much it can take, since craft sticks can snap suddenly and throw sharp splinters.
Frequently asked questions
Why do popsicle stick bridges use triangles?
A triangle keeps its shape because none of its corners can move unless a side changes length. A rectangle of sticks can be pushed into a slanted shape, which is called racking. A truss is a row of triangles sharing sides, so the whole frame stays rigid.
How many popsicle sticks does a simple truss bridge need?
This model uses 41 standard craft sticks: 11 sticks for each side truss, 3 bottom cross sticks, about 14 deck sticks and 2 top braces. The deck count changes with the spacing you choose, so buy a few extra and set aside any that are bowed.
What glue is best for a popsicle stick bridge?
Wood glue is the usual choice for structural joints, and white craft glue or tacky glue also works for a display model. Whichever you use, overlap the stick ends so the joint has plenty of glue area, clamp it, and let it set fully as the label directs before moving on.