Popsicle Stick Birdhouse: A Decorative Indoor Model
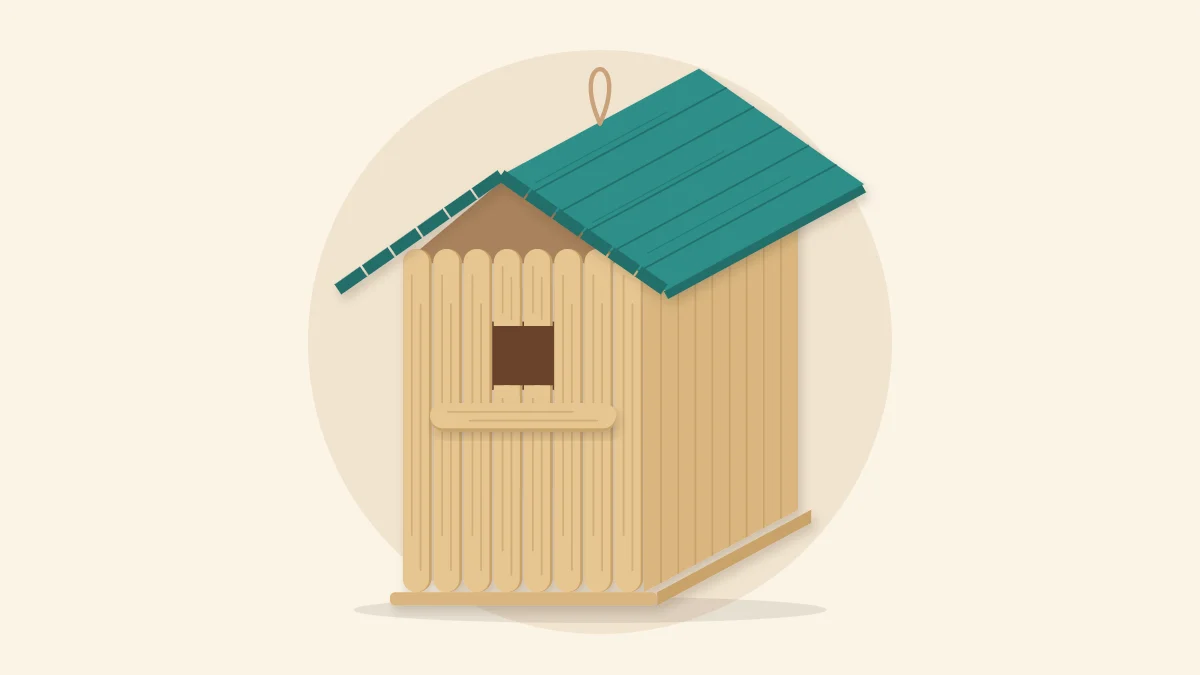
A decorative birdhouse model built from flat craft stick panels, with a square entrance formed by a gap in the front wall, a mini stick perch, a painted pitched roof and a twine loop.
Tutorial at a glance
What you need
- About 55 standard craft sticks, plus spares
- About 15 mini craft sticks
- White craft glue or tacky glue
- Wood glue
- Sturdy scissors and fine sandpaper
- Rubber bands and clothespins
- Pencil, ruler and wax paper
- Twine
- Acrylic craft paint and a flat brush
This popsicle stick birdhouse is a decorative model for a shelf, a mantel or an indoor hook. It has a floor, four walls, a pitched roof, a square entrance and a tiny perch, all built from flat panels of craft sticks. It is an ornament only: it is not a nesting box for real birds and it is not made for outdoor use.
Every part is glued flat first and assembled afterward, which keeps the walls straight. Sizes are suggestions, so measure your own sticks before you start.
What You Need
- About 55 standard craft sticks, each about 4.5 in (11.4 cm) long, plus spares
- About 15 mini craft sticks, each about 2.5 in (6.4 cm) long
- White craft glue or tacky glue, and wood glue for the wall corners
- Sturdy scissors, warm tap water and fine sandpaper
- Rubber bands and clothespins
- Pencil, ruler and wax paper
- A heavy book to use as a weight
- Twine, about 8 in (20 cm)
- Acrylic craft paint and a flat brush
Craft sticks are the same thing as popsicle sticks. Buy new ones, since flat, clean sticks make flat panels.
Parts and Stick Counts
There are seven panels. Each is a row of standard sticks laid side by side and held together by two mini sticks glued across the back as cross sticks.
| Part | Sticks | Notes |
|---|---|---|
| Floor | 9 standard, 2 mini | Cross sticks underneath |
| Front wall | 9 standard, 2 mini | 3 sticks cut for the opening |
| Back wall | 9 standard, 2 mini | Cross sticks inside |
| Two side walls | 14 standard, 4 mini | 7 sticks each |
| Two roof panels | 14 standard, 4 mini | 7 sticks each |
| Perch | 1 mini | Below the opening |
That comes to 55 standard and 15 mini sticks.
Glue the Plain Panels
Work on wax paper. For each panel, push the sticks together against a ruler so the ends are level, then glue two mini sticks across them, about 1 in (2.5 cm) in from each end. Press under a heavy book until the glue has set.
Make the floor and back wall from 9 sticks each, and the two side walls and two roof panels from 7 sticks each. On the roof panels, set the cross sticks about 1.25 in (3.2 cm) in from each end; they will sit just inside the front and back walls and help locate the roof.
The Front Wall and Opening
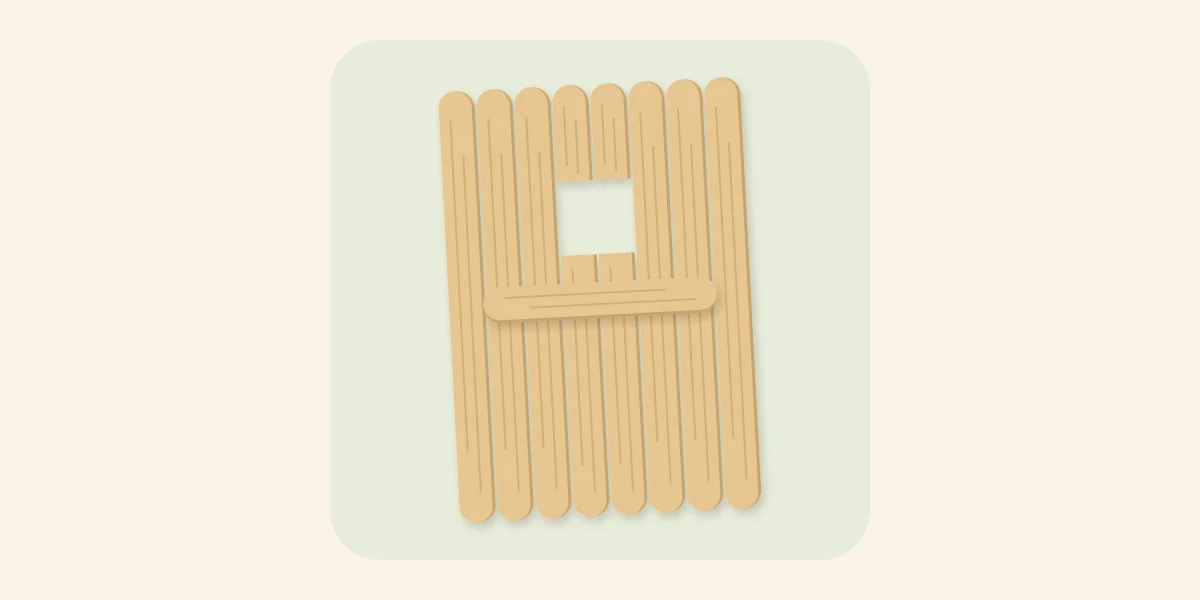
The entrance is a square gap left in the panel, so nothing is cut out of a finished wall. The three center sticks are replaced by shorter pieces above and below the opening.
Soften three standard sticks in warm tap water. From each, cut a lower piece about 2.25 in (5.7 cm) long and an upper piece about 1.1 in (2.8 cm) long, using sturdy scissors, and sand the cut ends square. Wear eye protection, and have an adult do the cutting when children are helping.
Lay three whole sticks on each side and the short pieces in the center: lower pieces level with the bottom of the wall, upper pieces level with the top. The gap left between them is about three sticks wide and the same height, a square in the upper middle of the wall. Glue one mini cross stick over the upper pieces, close to the top, and the other across the lower part of the wall, so every short piece is held. Finally, glue a mini stick to the front as a perch, just below the opening.
Walls, Roof and Hanger
Dry fit the four walls on the floor first. The front and back walls are as wide as the floor; the narrower side walls fit between them, leaving a small ledge of floor at the front and back.
- Glue the walls to the floor. Run wood glue along the bottom edge and side edges of each wall. Stand the front and back walls on the floor, cross sticks facing in, and fit the side walls between them. Slip two rubber bands around all four walls, one low and one high, to hold the corners closed. Check from above that the box is square, adjust, and leave it until the glue has set.
- Add the roof panels. Run glue along the top edges of the side walls. Lean the two roof panels together so they meet at a ridge above the center, with their lower edges overhanging the side walls and their ends overhanging front and back. Glue the ridge, but leave about 1 in (2.5 cm) at its middle unglued. Hold the roof with a rubber band over the top until it has set.
- Paint the roof and attach the twine. Paint both roof panels and let them dry to the touch. Knot the twine into a loop, push the knot down through the unglued gap in the ridge with a pencil point, and seal the gap with glue so the knot is held under the ridge.
Tip
Rubber bands that are too tight will pull the walls inward. Use bands that are only just snug.

Painting and Finishing
A painted roof over natural walls is the classic look. Use thin coats and brush along the length of the sticks; the guide on painting popsicle sticks smoothly explains how to avoid warping and raised grain. The triangular gaps under the roof at the front and back can be left open or backed with a triangle of painted card glued inside.
Paint pen dots along the roof edge or a line around the opening add detail.
Common Problems
- The walls will not stand square. A panel is wider than its partner because the sticks vary. Compare the front against the back and one side against the other, and sand the wider panel before gluing.
- The short pieces fall out. A cross stick missed them. Each upper and lower piece must lie under a cross stick.
- The roof slides before it sets. Too much glue makes the panels skate. Use less, wait until it turns tacky, then set the roof and band it.
Displaying the Birdhouse
Watch out
Keep this model indoors, away from candles and heat. Hang it only from a secure hook, clear of places where it could fall on anyone, and keep mini sticks away from young children and pets.
On a shelf, the birdhouse sits well beside a simple decorative popsicle stick cottage, which uses the same wall panels at a larger scale. For a seasonal display, hang it near a craft stick star garland painted in the roof color.
Frequently asked questions
Can real birds use a popsicle stick birdhouse?
No. This is a decorative indoor model, not a nesting box. It is built from thin craft sticks and craft glue for display on a shelf or an indoor hook, and it is not made for outdoor use.
How do you make the entrance opening in the front wall?
Build the opening into the front wall instead of cutting it out. Replace the three center sticks with short pieces above and below a gap, and hold them in place with the cross sticks on the back. The gap forms a neat square entrance.
How do you keep the walls square while the glue sets?
Stand the four walls on the floor panel and slip two rubber bands around them, one low and one high. Keep the bands only just snug, check the box from above, and adjust the corners before the glue grabs.